Showing posts with label crafts. Show all posts
Wednesday, October 2, 2013
Halloween bunting
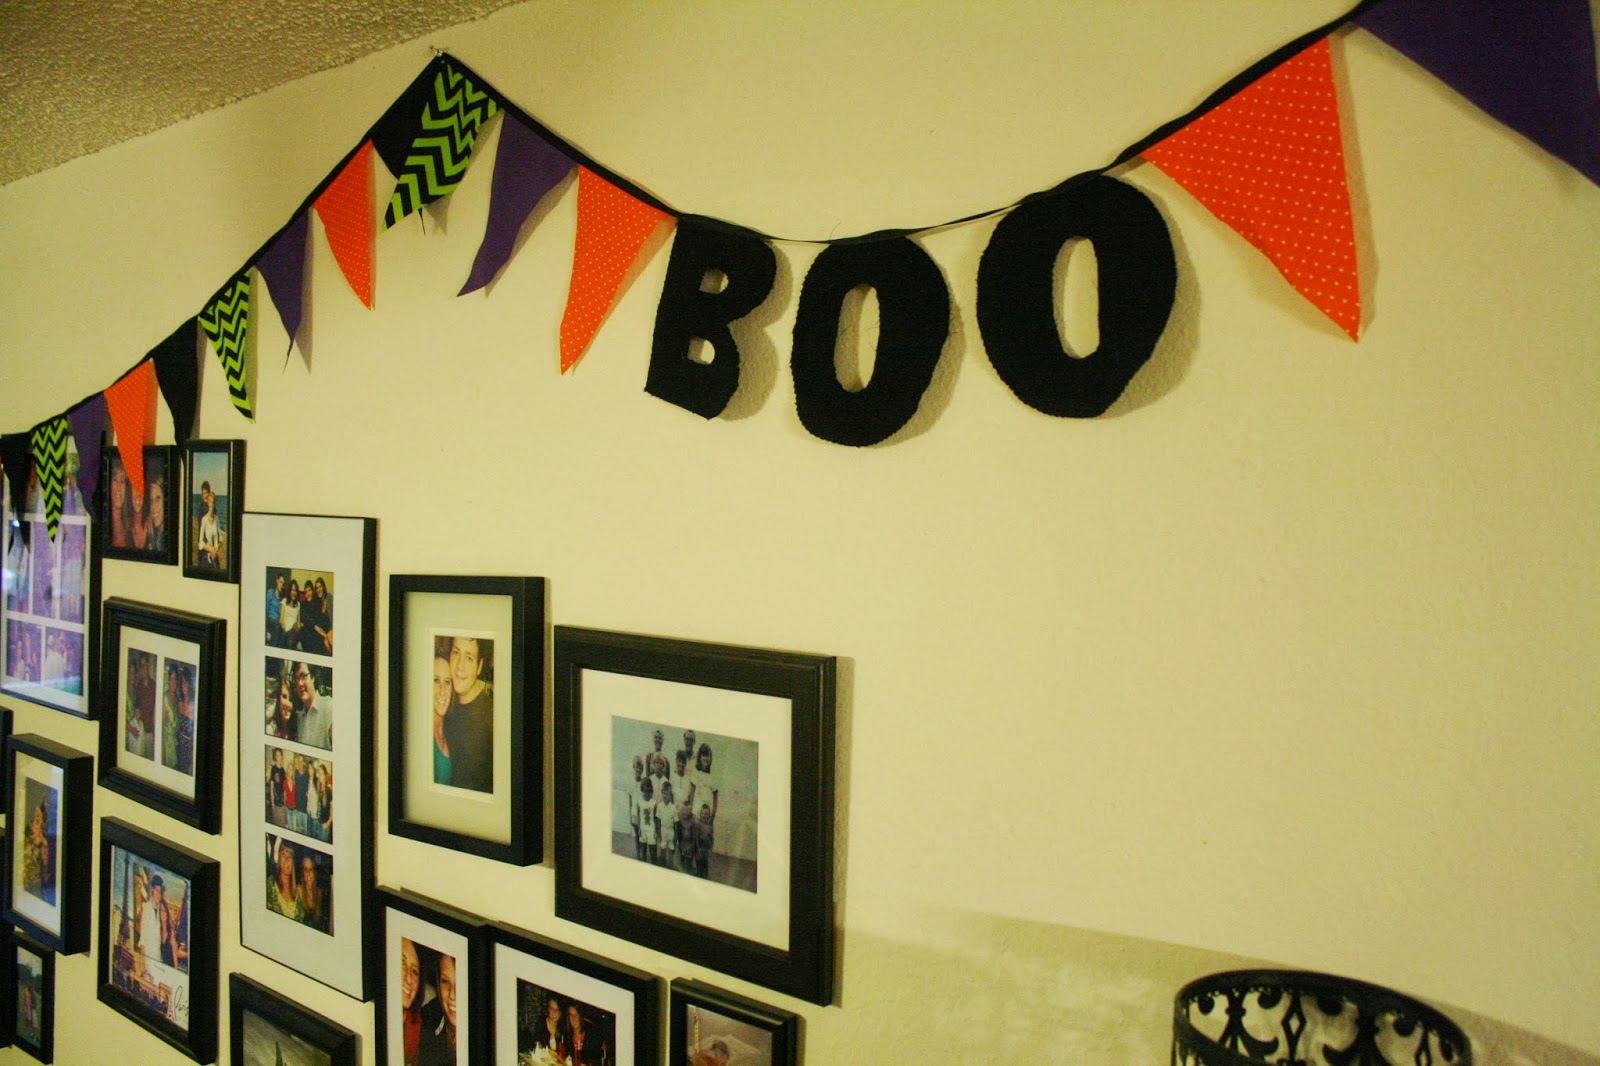
Halloween bunting, because why not? A couple weeks ago I got wild and bought Halloween fabric because it was on sale and because October marks the beginning of the sewing season for me and I needed something to get my feet wet after not touching my sewing machine for a good half year. After sewing on fancy machines for months my little guy took some getting used to. I'm still reaching for things that don't exist, but I'm back in business!
There are more detailed instructions on how to throw together some bunting here, I only varied from that slightly this go around. I added the words "BOO" of course, and instead of just sewing it together triangle to triangle, I sewed a black ribbon across the top. It adds a bit more stability and it's cute!
For my letters I just printed out an outline of big letters via Microsoft Word and then used them as stencils. I also had grand plans of including a bat, but I gave up on that fairly quickly. Cutting it out was such a huge pain, I couldn't wrap my mind around sewing it.
So typical. Sophie is exciting that sewing season has arrived. Fur on all the fabric.
So my letters wouldn't unravel, I zigzag stitched around the edges. I also created a pattern with my colors this time around. Because Halloween is organized like that.
I ran out of ribbon like five triangles before being done and had to go out and grab some more. That right there is the story of my life.
I think it's real fun! I love the colors! The orange and green were "Halloween" fabrics but the purple and black are just the cheapest of the cheap broadcloth. You could totally do it all in broadcloth, and in fact I recommend it. It almost works better, the orange and green are prints so they are only usable on one side. A fully colored fabric is probably your best bet. I'm just a sucker for fun prints.
And isn't this guy the sweetest? While unloading the Halloween decor, I found him. I think he's from Target, and I guess we got him last year. It's always so fun getting all the decorations out, especially when you have a terrible memory like me and forget what decorations you have. It's like Christmas... but Halloween! Busting out the Halloween gear was the first thing I did yesterday morning, I was just a TAD excited about it finally being October and it finally being acceptable to get spooky!
Labels:
bunting,
crafts,
decorations,
Halloween,
halloween bunting,
sewing
Tuesday, July 3, 2012
Kennedy's blanket
This blanket took me forever. Like months! It was meant as a birthday present for Kennedy, and her birthday was in April. Life got in the way unfortunately, but better late than never I finished it up and when we visited this weekend I was finally able to give it to her!
Slumber party!
I used the same method (aka, making it up as I go) as I did to make my Weasley style blanket last year. I just picked prettier colors. I forgot how long sewing all those squares together takes. And then hand sewing the all the intersections through the batting and back... phew! I'm happy with it though. I hope Kennedy is too. It's not perfect, but it's got character!
I may or may not have stood on my coffee table to get this shot.
Sophie was a little attached to this blanket, she thought I was making it for her. She was with it through all it's many stages; she sat on the squares as I cut them and sewed them together, sat on the backing, in the batting, rolled all over the blanket while it was spread out in my living room, and her favorite part was attacking the thread while I hand sewed it at the end. Of course when it was finished, she promptly laid on it. Sorry for all the grey hairs Kennedy, I tried to get most of them off. Sophie sends her love to you and your new blanket.
I'm not sure if Kennedy was really that stoked about it (I mean what kid would be hyped about a blanket?), but I thought it would be a cool thing to grow up with. So she can remember her Auntie Marie who made way too much stuff in her free time.
Thursday, March 1, 2012
Hello March, and Step by Step Sewing Part 1!
Can you believe it? It is March already. Two months of this new year already gone. Jeeze!
March is always a good month. The weather is usually awesome (time to turn the ac back on, I woke up sweating this morning), there are birthdays to celebrate, and spring break! Oh wait I'm not in school. But spring break for Brendon! And after a little schedule switcheroo last month, Kristy is coming to visit next weekend! And maybe Z too! I have high hopes for this lovely month.
Alrighty, so I've had a couple questions about how exactly I make these things I sew so I thought I'd document my next sewing project to show you how I roll. Or sew.
First and foremost, I use patterns. I wish I was talented enough to just make things on my own, however I am not. Eventually I'd love to be able to just whip something together out of an idea in my head, but until then, patterns are my bread and butter. So I guess the first step in sewing anything, my way anyway, is to pick out a pattern. I'm using this Simplicity pattern I got a while back.
Every pattern usually comes with multiple pieces or variations. In this pattern's case it comes with a skirt, dress, and shirt pattern with a variation on each. Each piece gets a letter. I am doing A, which is just the dress pattern with no variation, the grey dress in the top left corner. I plan on eventually making the shirt (D) and maybe the skirt (C) as well.
The back of the pattern tells you all the info on what kind of fabric to get, how much, and what kind of notions (thread, zippers, buttons, etc) you'll need depending on what part or version you're making:
I apologize for the terrible quality of these photos, I was rushing, bad blogger! There is always usually a pdf of the back of the pattern envelope online, for example here. I suggest checking that out (click the link!), it's way easier to read. Sometimes I'll print that out to take with me to the fabric store instead of the whole pattern. Deciphering these things takes practice and even then it still gets confusing. They break it down for you by parts of the pattern by letter and then by size. I usually highlight or circle the parts I need and in what size.
Sizing for patterns is different than your usual dress/pant size. I am usually a 2 at most stores, but when sewing I use a size 8 or 10. They give you body measurements to help you figure out your size, as well as finished garment measurements, but even then it's weird. Some patterns run big, some small. It's good to just eye it and try it on as you go. And it's always better to err on a size bigger, you can take things in but it's usually impossible to make things bigger.
The pattern gives you lengths of fabric for both 45" and 60" widths. Most fabrics, unless you're at a fancy specialty store or are buying home decor fabric, are sold in 45" widths. So, for this particular dress I needed 2 and 1/8 yards of fabric, 1 yard of lining, 3/4 of lightweight fusible interfacing, thread, a 12" inch zipper (it calls for an invisible zipper, but long story short, I just got a regular one), and four 7/8" buttons. They always give you suggestions for good fabrics to use at the top of the list. Very helpful, it gives you an idea of the texture/weight of fabric you're looking for. I chose to get some pink seersucker for my dress, which is made of cotton. You should always wash your fabrics if you're using something like cotton or a knit that might shrink. I am extra guilty of not doing this, but post-sewing-shrinkage can seriously ruin a dress (I found out the hard way) so I'm making an effort to do so from here on out.
Here are my materials for this little dress: I've got my seersucker fabric, some broadcloth lining (I always just get extra cheap stuff for lining), buttons, matching thread, and a zipper. I got all this stuff today at Hancock Fabrics for under $20, a pretty good deal. The seersucker was the bulk of the price. Not pictured is my interfacing, I always keep a few yards on hand because you use it for everything.
Here's a little peek into what's inside that little envelope:
On the left are the actual patterns that you will cut out. They're printed on super thin tissue-like paper, there are A LOT of them. There are usually at least 2-3 sheets folded up that unfold to be about 5'x5'. On the right are your cutting and sewing instructions. These tell you how to lay out the patterns on the fabric when cutting them. Crucial info. Also, of course, it tells you how to put the whole thing together.
So next up, after washing and drying my fabric and lining, I'll show you the pattern and fabric cutting process. Really exciting stuff! Hopefully this info is helpful. Feel free to ask any questions if I wasn't clear about something or didn't cover something you'd like to know. Sew on y'all!
March is always a good month. The weather is usually awesome (time to turn the ac back on, I woke up sweating this morning), there are birthdays to celebrate, and spring break! Oh wait I'm not in school. But spring break for Brendon! And after a little schedule switcheroo last month, Kristy is coming to visit next weekend! And maybe Z too! I have high hopes for this lovely month.
Alrighty, so I've had a couple questions about how exactly I make these things I sew so I thought I'd document my next sewing project to show you how I roll. Or sew.
First and foremost, I use patterns. I wish I was talented enough to just make things on my own, however I am not. Eventually I'd love to be able to just whip something together out of an idea in my head, but until then, patterns are my bread and butter. So I guess the first step in sewing anything, my way anyway, is to pick out a pattern. I'm using this Simplicity pattern I got a while back.
Every pattern usually comes with multiple pieces or variations. In this pattern's case it comes with a skirt, dress, and shirt pattern with a variation on each. Each piece gets a letter. I am doing A, which is just the dress pattern with no variation, the grey dress in the top left corner. I plan on eventually making the shirt (D) and maybe the skirt (C) as well.
The back of the pattern tells you all the info on what kind of fabric to get, how much, and what kind of notions (thread, zippers, buttons, etc) you'll need depending on what part or version you're making:
I apologize for the terrible quality of these photos, I was rushing, bad blogger! There is always usually a pdf of the back of the pattern envelope online, for example here. I suggest checking that out (click the link!), it's way easier to read. Sometimes I'll print that out to take with me to the fabric store instead of the whole pattern. Deciphering these things takes practice and even then it still gets confusing. They break it down for you by parts of the pattern by letter and then by size. I usually highlight or circle the parts I need and in what size.
Sizing for patterns is different than your usual dress/pant size. I am usually a 2 at most stores, but when sewing I use a size 8 or 10. They give you body measurements to help you figure out your size, as well as finished garment measurements, but even then it's weird. Some patterns run big, some small. It's good to just eye it and try it on as you go. And it's always better to err on a size bigger, you can take things in but it's usually impossible to make things bigger.
The pattern gives you lengths of fabric for both 45" and 60" widths. Most fabrics, unless you're at a fancy specialty store or are buying home decor fabric, are sold in 45" widths. So, for this particular dress I needed 2 and 1/8 yards of fabric, 1 yard of lining, 3/4 of lightweight fusible interfacing, thread, a 12" inch zipper (it calls for an invisible zipper, but long story short, I just got a regular one), and four 7/8" buttons. They always give you suggestions for good fabrics to use at the top of the list. Very helpful, it gives you an idea of the texture/weight of fabric you're looking for. I chose to get some pink seersucker for my dress, which is made of cotton. You should always wash your fabrics if you're using something like cotton or a knit that might shrink. I am extra guilty of not doing this, but post-sewing-shrinkage can seriously ruin a dress (I found out the hard way) so I'm making an effort to do so from here on out.
Here are my materials for this little dress: I've got my seersucker fabric, some broadcloth lining (I always just get extra cheap stuff for lining), buttons, matching thread, and a zipper. I got all this stuff today at Hancock Fabrics for under $20, a pretty good deal. The seersucker was the bulk of the price. Not pictured is my interfacing, I always keep a few yards on hand because you use it for everything.
Here's a little peek into what's inside that little envelope:
On the left are the actual patterns that you will cut out. They're printed on super thin tissue-like paper, there are A LOT of them. There are usually at least 2-3 sheets folded up that unfold to be about 5'x5'. On the right are your cutting and sewing instructions. These tell you how to lay out the patterns on the fabric when cutting them. Crucial info. Also, of course, it tells you how to put the whole thing together.
So next up, after washing and drying my fabric and lining, I'll show you the pattern and fabric cutting process. Really exciting stuff! Hopefully this info is helpful. Feel free to ask any questions if I wasn't clear about something or didn't cover something you'd like to know. Sew on y'all!
Wednesday, February 15, 2012
Happy Birthday Daddio!
Today my Dad turns 54! Whoohoo! I'm sure he is stoked. As he puts it, "one more year until retirement". Although I can't imagine him not working, his dad still works everyday and he just turned 80!
We had a little early birthday celebration for him up here Sunday evening. We ate at Moonshine, which is one of our favorite restaurants we've discovered in Austin. If you are ever in the area, eat there. It's fancy home cooked goodness and it is delish.
After dinner we hung out at our place for a bit for coffee, tea, and of course (cup)cakes and presents! And even though we were at home, I still was too lazy to grab an actual camera. My bad.
The cupcakes were so good, they are my step-momma's specialty! There were red velvet and apple spice cupcakes, yum yum yum!
This is the card I made him! It's a party-animal-birthday-bass obviously, as my dad is an avid fisherman. I think it came out great, except that I lost my glue stick so I was forced to use Elmer's glue. That stuff warps paper like no ones business plus it gets everywhere. And when you're the worlds messiest person already, it just gets ridiculous. But aside from the wonkyness and stickiness, it was a lot of fun to make. I love making cards! No more store bought cards for me. These are way more fun, cheaper, and I think they're a bit more special if not just extra weird and funny looking.
So happy birthday Daddy! Thank you for supporting me through everything, being hilarious, and giving me your "project" genes. We love you and fish on!
Thursday, February 9, 2012
DIY Pincushion
For a while now I've been keeping my pins in the little plastic box they came in. It works out fine except I knock it over and spill them all the time. On the floor, on my desk, all over the place. Pins everywhere constantly. And then I poke myself ten thousand times picking them all up. I knew a pincushion was the answer. And I finally made one!
I used these instructions from the Purl Bee. This site is full of all kinds of adorable crafty things to make, plus pretty things to drool over, it's awesome. They make me want to go knit something right now. I taught myself to knit my freshman year of college, but of course I've forgotten. I need to refresh my memory!
This is the stuff you'll need for your pincushion, super easy, stuff you probably have around already (if you're a sewer):
- Sewing needle
- Embroidery needle
- Scissors
- Thread
- Embroidery thread
- A little bit of felt
- A little bit of fabric
- Some stuffing
- Something to trace a circle (I used a salad plate, it was about 9" in diameter)
The rest of the directions are on the site, I'm too lazy to type it all out. It's easy peasy, I made mine in about 20 minutes. It doesn't even have to match. I did mine all matchy-matchy, but it would be super cute with contrasting colors. Whatever you've got lying around.
Mine came out a little wonky, but that's how I roll so I like it. It has character. These would make sweet little gifts for a crafty person in your life. Or handy things to keep you from scattering pins everywhere.
I used these instructions from the Purl Bee. This site is full of all kinds of adorable crafty things to make, plus pretty things to drool over, it's awesome. They make me want to go knit something right now. I taught myself to knit my freshman year of college, but of course I've forgotten. I need to refresh my memory!
This is the stuff you'll need for your pincushion, super easy, stuff you probably have around already (if you're a sewer):
- Sewing needle
- Embroidery needle
- Scissors
- Thread
- Embroidery thread
- A little bit of felt
- A little bit of fabric
- Some stuffing
- Something to trace a circle (I used a salad plate, it was about 9" in diameter)
The rest of the directions are on the site, I'm too lazy to type it all out. It's easy peasy, I made mine in about 20 minutes. It doesn't even have to match. I did mine all matchy-matchy, but it would be super cute with contrasting colors. Whatever you've got lying around.
Subscribe to:
Posts (Atom)